COST: $15
EFFORT: 1 out of 5
RESULTS: 5 out of 5
I’ve made a lot of signs and lettered canvases over the years, but this is the first one I made specifically because I needed to fill a strange chunk of wall. “Functional art,” indeed.
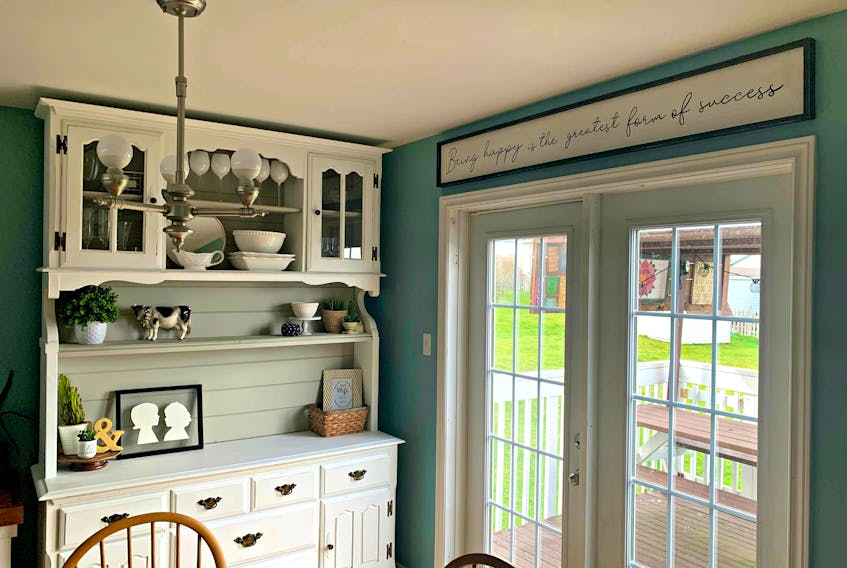
Remember when we extended our dining room hutch? Well, bumping our hutch 20” higher — so it came up almost to the ceiling — looked wonderful, but it did throw off the balance in other parts of the room.
The space between the top of our patio doors and the ceiling had never looked “weird” before, but suddenly it was a gaping hole. The hutch’s height was making the doors feel stunted, so I decided we needed a long white farmhouse-style sign to fill the space.

For once, the measurements had to be exact. I wanted the finished sign to be exactly the length of the patio doors, so we measured from one side of the doors to the other and then subtracted the width of a 1x2 board on each side (for the sign’s frame).
I didn’t care how tall the sign was, as long as there was room for 1x2 trim along the top and bottom and we’d be able to hang it equidistant from the doors and the ceiling.
While there are times my Handy Husband works a little more, ah, methodically than I’d like, this wasn’t one of them. He’d cut the sign board down to size and attached the 1x2 trim with our finish nailer before I knew what was happening. I’d planned to paint the sign and the trim separately, but I bit my tongue and decided it was more important that the sign was assembled. #marriage
I brushed a single coat of white paint across the sign (“Picket Fence” by Fusion Mineral Paint) so the wood grain was still visible. Then I had to get the lettering ready. I held a piece of printer paper over the sign to see how many sheets I’d need for the wording, and it worked out that six sheets would fit neatly with slight spacing at the beginning and the end.

I’d narrowed my quote selection down to one that felt especially timely at the moment (“Being happy is the greatest form of success”) and I picked a loopy, casual, farmhouse-style font called Andalusia from DaFont.com. I typed the quote into six relatively equal chunks, lumping together “is the” and “form of,” took screenshots of each chunk and printed them out — one per piece of 8 1/2 x 11 printer paper, horizontally.
Next, I used my favourite letter-transferring method, which involves scribbling on the back of each sheet with a pencil, pressing the sheet onto the sign and tracing the letters with a sharp screwdriver. The pressure from the screwdriver forces the pencil smudge onto the sign, leaving a light grey outline that’s easy to see.
I grabbed a tiny paintbrush and a jar of black paint (“Coal Black” by Fusion Mineral Paint), and settled in to paint over the pencil letters. It went quite quickly and it only needed one coat.
The tedious part came next: painting the trim my Handy Husband had so thoughtfully attached for me without smearing any black paint onto the crisp white sign. Can you say “steady hand”? Yikes.

It took about an hour, but I finally painted all three edges of all four pieces of trim. If you’re trying this project at home, I HIGHLY recommend painting or staining the trim separately before attaching it to your sign. Unless you’re partial to having a hand that looks like a claw, that is.
I let the sign dry overnight since it was bedtime, and then roughed up the trim a bit the next morning with some sandpaper so the wood showed through here and there. Then my Handy Husband and I attached two sawtooth picture-hangers to the back, got out the level and hung the sign above the patio doors. Whew! A perfect fit.
The sign itself looks great, but what I love even more is how it fills the gap above the patio doors and helps to balance the height of the new hutch. Designers say every room needs a touch of black, and this new sign feels like just the right touch of “eyeliner” above the white patio doors.